Functions
- Deutsche: Deze pagina is niet vertaald naar het Duits.
- Español: Esta página no está traducida al castellano.
- Français: Cette page n'est pas traduite en français.
- Bahasa Indonesia: Halaman ini tidak diterjemahkan ke bahasa Indonesia.
- Italiano: Questa pagina non è tradotta in italiano.
- Norsk: Denne siden er ikke oversatt til norsk.
- Polski: Ta strona nie jest przetłumaczona na język polski.
- Português: Esta página não está traduzida para o português.
- русский язык: Эта страница не переведена на русский язык.
- српски: Ова страница није преведена на српски.
- Svenska: Denna sida är inte översatt till svenska.
- Türkçe: Bu sayfa Türkçe'ye çevrilmemiştir.
- 中文: 此页面未翻译成中文.
Page: Setup -> Function
For a full list of supported Functions, see Supported Functions.
Function controllers perform tasks that often involve the use of Inputs and Outputs.
Note
"Last" means the Function will only acquire the last (latest) measurement in the database. "Past" means the Function will acquire all measurements from the present until the "Max Age (seconds)" that's been set (e.g. if measurements are acquired every 10 seconds, and a Max Age is set to 60 seconds, there will on average be 6 measurements returned to the Function to operate with).
Custom Functions~
There is a Custom Function import system in Mycodo that allows user-created Functions to be used in the Mycodo system. Custom Functions can be uploaded on the [Gear Icon] -> Configure -> Custom Functions page. After import, they will be available to use on the Setup -> Function page.
If you develop a working Function module, please consider creating a new GitHub issue or pull request, and it may be included in the built-in set.
Open any of the built-in modules located in the directory Mycodo/mycodo/functions for examples of the proper formatting.
There are also example Custom Functions in the directory Mycodo/mycodo/functions/examples
Additionally, I have another github repository devoted to Custom Modules that are not included in the built-in set, at kizniche/Mycodo-custom.
For Functions that require new measurements/units, they can be added on the [Gear Icon] -> Configure -> Measurements page.
PID Controller~
A proportional-derivative-integral (PID) controller is a control loop feedback mechanism used throughout industry for controlling systems. It efficiently brings a measurable condition, such as the temperature, to a desired state and maintains it there with little overshoot and oscillation. A well-tuned PID controller will raise to the setpoint quickly, have minimal overshoot, and maintain the setpoint with little oscillation.
PID settings may be changed while the PID is activated and the new settings will take effect immediately. If settings are changed while the controller is paused, the values will be used once the controller resumes operation.
PID Controller Options~
| Setting | Description |
|---|---|
| Activate/Deactivate | Turn a particular PID controller on or off. |
| Pause | When paused, the control variable will not be updated and the PID will not turn on the associated outputs. Settings can be changed without losing current PID output values. |
| Hold | When held, the control variable will not be updated but the PID will turn on the associated outputs, Settings can be changed without losing current PID output values. |
| Resume | Resume a PID controller from being held or paused. |
| Direction | This is the direction that you wish to regulate. For example, if you only require the temperature to be raised, set this to "Up," but if you require regulation up and down, set this to "Both." |
| Period | This is the duration between when the PID acquires a measurement, the PID is updated, and the output is modulated. |
| Start Offset (seconds) | Wait this duration before attempting the first calculation/measurement. |
| Max Age | The time (in seconds) that the sensor measurement age is required to be less than. If the measurement is not younger than this age, the measurement is thrown out and the PID will not actuate the output. This is a safety measure to ensure the PID is only using recent measurements. |
| Setpoint | This is the specific point you would like the environment to be regulated at. For example, if you would like the humidity regulated to 60%, enter 60. |
| Band (+/- Setpoint) | Hysteresis option. If set to a non-0 value, the setpoint will become a band, which will be between the band_max=setpoint+band and band_min=setpoint-band. If Raising, the PID will raise above band_max, then wait until the condition falls below band_min to resume regulation. If Lowering, the PID will lower below band_min, then wait until the condition rises above band_max to resume regulating. If set to Both, regulation will only occur to the outside min and max of the band, and cease when within the band. Set to 0 to disable Hysteresis. |
| Store Lower as Negative | Checking this will store all output variables (PID and output duration/duty cycle) as a negative values in the measurement database. This is useful for displaying graphs that indicate whether the PID is currently lowering or raising. Disable this if you desire all positive values to be stored in the measurement database. |
| KP Gain | Proportional coefficient (non-negative). Accounts for present values of the error. For example, if the error is large and positive, the control output will also be large and positive. |
| KI Gain | Integral coefficient (non-negative). Accounts for past values of the error. For example, if the current output is not sufficiently strong, the integral of the error will accumulate over time, and the controller will respond by applying a stronger action. |
| KD Gain | Derivative coefficient (non-negative). Accounts for predicted future values of the error, based on its current rate of change. |
| Integrator Min | The minimum allowed integrator value, for calculating Ki_total: (Ki_total = Ki * integrator; and PID output = Kp_total + Ki_total + Kd_total) |
| Integrator Max | The maximum allowed integrator value, for calculating Ki_total: (Ki_total = Ki * integrator; and PID output = Kp_total + Ki_total + Kd_total) |
| Output (Raise/Lower) | This is the output that will cause the particular environmental condition to rise or lower. In the case of raising the temperature, this may be a heating pad or coil. |
| Min On Duration, Duty Cycle, or Amount (Raise/Lower) | This is the minimum value that the PID output must be before Output (Lower) turns on. If the PID output is less than this value, Duration Outputs will not turn on, and PWM Outputs will be turned off unless Always Min is enabled. |
| Max On Duration, Duty Cycle, or Amount (Raise/Lower) | This is the maximum duration, volume, or duty cycle the Output (Raise) can be set to. If the PID output is greater than this value, the Max value set here will be used. |
| Min Off Duration (Raise/Lower) | For On/Off (Duration) Outputs, this is the minimum amount of time the Output must have been off for before it is allowed to turn back on. Ths is useful for devices that can be damaged by rapid power cycling (e.g. fridges). |
| Always Min (Raise/Lower) | For PWM Outputs only. If enabled, the duty cycle will never be set below the Min value. |
| Setpoint Tracking Method | Set a method to change the setpoint over time. |
PID Output Calculation~
PID Controllers can control a number of different output types (e.g. duration, volume, or PWM duty cycle). For most output types, the PID output (Control Variable) will be proportional (i.e. Output Duration = PID Control Variable). However, when outputting a duty cycle, it will be calculated as Duty Cycle = (Control Variable / Period) * 100.
Note
Control Variable = P Output + I Output + D Output. Duty cycle is limited within the 0 - 100 % range and the set Min Duty Cycle and Max Duty Cycle. An output duration is limited by the set Min On Duration and Max On Duration, and output volume similarly.
PID Tuning~
PID tuning can be a complex process, depending on the output device(s) used and the environment or system under control. A system with large perturbations will be more difficult to control than one that is stable. Similarly, output devices that are unsuitable may make PID tuning difficult or impossible. Learning how PID controllers operate and the theory behind their tuning will not only better prepare you to operate a PID controller, but also in the development of your system and selection and implementation of the output devices used to regulate your system.
PID Tuning Resources~
PID Control Theory~
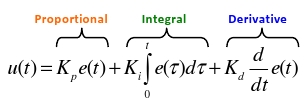
The PID controller is the most common regulatory controller found in industrial settings, for it"s ability to handle both simple and complex regulation. The PID controller has three paths, the proportional, integral, and derivative.
The Proportional takes the error and multiplies it by the constant KP, to yield an output value. When the error is large, there will be a large proportional output.
The Integral takes the error and multiplies it by KI, then integrates it (KI · 1/s). As the error changes over time, the integral will continually sum it and multiply it by the constant KI. The integral is used to remove perpetual error in the control system. If using KP alone produces an output that produces a perpetual error (i.e. if the sensor measurement never reaches the Set Point), the integral will increase the output until the error decreases and the Set Point is reached.
The Derivative multiplies the error by KD, then differentiates it (KD · s). When the error rate changes over time, the output signal will change. The faster the change in error, the larger the derivative path becomes, decreasing the output rate of change. This has the effect of dampening overshoot and undershoot (oscillation) of the Set Point.
The KP, KI, and KD gains determine how much each of the P, I, and D variables influence the final PID output value. For instance, the greater the value of the gain, the more influence that variable has on the output.
The output from the PID controller can be used in a number of ways. A simple use is to use this value as the number of seconds an output is turned on during a periodic interval (Period). For instance, if the Period is set to 30 seconds, the PID equation has the desired measurement and the actual measurement used to calculate the PID output every 30 seconds. The more the output is on during this period, the more it will affect the system. For example, an output on for 15 seconds every 30 seconds is at a 50 % duty cycle, and would affect the system roughly half as much as when the output is on for 30 seconds every 30 seconds, or at at 100 % duty cycle. The PID controller will calculate the output based on the amount of error (how far the actual measurement is from the desired measurement). If the error increases or persists, the output increases, causing the output to turn on for a longer duration within the Period, which usually in term causes the measured condition to change and the error to reduce. When the error reduces, the control variable decreases, meaning the output is turned on for a shorter duration of time. The ultimate goal of a well-tuned PID controller is to bring the actual measurement to the desired measurement quickly, with little overshoot, and maintain the setpoint with minimal oscillation.
Using temperature as an example, the Process Variable (PV) is the measured temperature, the Setpoint (SP) is the desired temperature, and the Error (e) is the distance between the measured temperature and the desired temperature (indicating if the actual temperature is too hot or too cold and to what degree). The error is manipulated by each of the three PID components, producing an output, called the Manipulated Variable (MV) or Control Variable (CV). To allow control of how much each path contributes to the output value, each path is multiplied by a gain (represented by KP, KI, and KD). By adjusting the gains, the sensitivity of the system to each path is affected. When all three paths are summed, the PID output is produced. If a gain is set to 0, that path does not contribute to the output and that path is essentially turned off.
The output can be used a number of ways, however this controller was designed to use the output to affect the measured value (PV). This feedback loop, with a properly tuned PID controller, can achieve a set point in a short period of time, maintain regulation with little oscillation, and respond quickly to disturbance.
Therefor, if one would be regulating temperature, the sensor would be a temperature sensor and the feedback device(s) would be able to heat and cool. If the temperature is lower than the Set Point, the output value would be positive and a heater would activate. The temperature would rise toward the desired temperature, causing the error to decrease and a lower output to be produced. This feedback loop would continue until the error reaches 0 (at which point the output would be 0). If the temperature continues to rise past the Set Point (this is may be acceptable, depending on the degree), the PID would produce a negative output, which could be used by the cooling device to bring the temperature back down, to reduce the error. If the temperature would normally lower without the aid of a cooling device, then the system can be simplified by omitting a cooler and allowing it to lower on its own.
Implementing a controller that effectively utilizes KP, KI, and KD can be challenging. Furthermore, it is often unnecessary. For instance, the KI and KD can be set to 0, effectively turning them off and producing the very popular and simple P controller. Also popular is the PI controller. It is recommended to start with only KP activated, then experiment with KP and KI, before finally using all three. Because systems will vary (e.g. airspace volume, degree of insulation, and the degree of impact from the connected device, etc.), each path will need to be adjusted through experimentation to produce an effective output.
Quick Setup Examples~
These example setups are meant to illustrate how to configure regulation in particular directions, and not to achieve ideal values to configure your KP, KI, and KD gains. There are a number of online resources that discuss techniques and methods that have been developed to determine ideal PID values (such as here, here, here, here, and here) and since there are no universal values that will work for every system, it is recommended to conduct your own research to understand the variables and essential to conduct your own experiments to effectively implement them.
Provided merely as an example of the variance of PID values, one of my setups had temperature PID values (up regulation) of KP = 30, KI = 1.0, and KD = 0.5, and humidity PID values (up regulation) of KP = 1.0, KI = 0.2, and KD = 0.5. Furthermore, these values may not have been optimal but they worked well for the conditions of my environmental chamber.
Exact Temperature Regulation~
This will set up the system to raise and lower the temperature to a certain level with two regulatory devices (one that heats and one that cools).
Add a sensor, then save the proper device and pin/address for each sensor and activate the sensor.
Add two outputs, then save each GPIO and On Trigger state.
Add a PID, then select the newly-created sensor. Change Setpoint to the desired temperature, Regulate Direction to "Both". Set Raise Output to the relay attached to the heating device and the Lower Relay to the relay attached to the cooling device.
Set KP = 1, KI = 0, and KD = 0, then activate the PID.
If the temperature is lower than the Set Point, the heater should activate at some interval determined by the PID controller until the temperature rises to the set point. If the temperature goes higher than the Set Point (or Set Point + Buffer), the cooling device will activate until the temperature returns to the set point. If the temperature is not reaching the Set Point after a reasonable amount of time, increase the KP value and see how that affects the system. Experiment with different configurations involving only Read Interval and KP to achieve a good regulation. Avoid changing the KI and KD from 0 until a working regulation is achieved with KP alone.
View graphs in the 6 to 12 hour time span to identify how well the temperature is regulated to the Setpoint. What is meant by well-regulated will vary, depending on your specific application and tolerances. Most applications of a PID controller would like to see the proper temperature attained within a reasonable amount of time and with little oscillation around the Setpoint.
Once regulation is achieved, experiment by reducing KP slightly (~25%) and increasing KI by a low amount to start, such as 0.1 (or lower, 0.01), then start the PID and observe how well the controller regulates. Slowly increase KI until regulation becomes both quick and with little oscillation. At this point, you should be fairly familiar with experimenting with the system and the KD value can be experimented with once both KP and KI have been tuned.
High Temperature Regulation~
Often the system can be simplified if two-way regulation is not needed. For instance, if cooling is unnecessary, this can be removed from the system and only up-regulation can be used.
Use the same configuration as the Exact Temperature Regulation example, except change Regulate Direction to "Raise" and do not touch the "Down Relay" section.
PID Autotune~
Warning
This is an experimental feature. It is best not used until you are familiar with the theory, operation, and tuning of a PID.
The Autotune function is a standalone controller that is useful for determining appropriate Kp, Ki, and Kd gains for use in the a PID controller. The autotuner will manipulate an output and analyze the measured response in a particular environment/system. It will take several cycles of perturbing the system with the chosen output before enough data is available to calculate the PID gains. In order to use this feature, select a Measurement and an Output that can module the specific condition being measured. Then, configure the Noise Band and Outstep and activate the function. Log lines of the autotuner will appear in the daemon log ([Gear Icon] -> Mycodo Logs -> Daemon Log). While the autotune is being performed, it is recommended to create a dashboard graph that includes the Measurement and Output in order to see what the PID Autotuner is doing and to notice any potential issues with the autotune settings that have been configured. If the autotune is taking a long time to complete, there may not be enough stability in the system being manipulated to calculate a reliable set of PID gains. This may be because there are too many perturbations to the system, or conditions are changing too rapidly to acquire consistent measurement oscillations. If this is the case, try modifying your system to increase stability and yield consistent measurement oscillations. Once the autotune successfully completes, perturbations may be reintroduced in order to further tune the PID controller to handle them.
| Setting | Description |
|---|---|
| Measurement | This is the Input or Function measurement that is measuring the specific condition that the Output will affect. For instance, this could be a temperature measurement and the output could be a heater. |
| Output | This is the Output that will affect the measurement when it's activated. The autotune function will periodically turn this output on in order to raise the measurement beyond the setpoint. |
| Period | This is the period of time between the Output being turned on. This should be set to the same Period you wish to use for your PID controller. A different Period can significantly affect the PID gains that the autotune produces. |
| Setpoint | This is the desired measurement condition value. For instance, if temperature is being measured, this should be set a several degrees higher than the current temperature so the output, when activated, will cause the temperature to rise beyond the setpoint. |
| Noise Band | This is the amount above the setpoint the measured condition must reach before the output turns off. This is also how much below the setpoint the measured condition must fall before the output turns back on. |
| Outstep | This is how many seconds the output will turn on every PID Period. For instance, to autotune with 50% power, ensure the Outstep is half the value of the PID Period. |
| Direction | This is the direction for which the Output will push the Measurement. For instance, a heater will raise temperature, whereas a cooler will lower temperature. |
Typical graph output will look like this:

And typical Daemon Log output will look like this:
2018-08-04 23:32:20,876 - mycodo.pid_3b533dff - INFO - Activated in 187.2 ms
2018-08-04 23:32:20,877 - mycodo.pid_autotune - INFO - PID Autotune started
2018-08-04 23:33:50,823 - mycodo.pid_autotune - INFO -
2018-08-04 23:33:50,830 - mycodo.pid_autotune - INFO - Cycle: 19
2018-08-04 23:33:50,831 - mycodo.pid_autotune - INFO - switched state: relay step down
2018-08-04 23:33:50,832 - mycodo.pid_autotune - INFO - input: 32.52
2018-08-04 23:36:00,854 - mycodo.pid_autotune - INFO -
2018-08-04 23:36:00,860 - mycodo.pid_autotune - INFO - Cycle: 45
2018-08-04 23:36:00,862 - mycodo.pid_autotune - INFO - found peak: 34.03
2018-08-04 23:36:00,863 - mycodo.pid_autotune - INFO - peak count: 1
2018-08-04 23:37:20,802 - mycodo.pid_autotune - INFO -
2018-08-04 23:37:20,809 - mycodo.pid_autotune - INFO - Cycle: 61
2018-08-04 23:37:20,810 - mycodo.pid_autotune - INFO - switched state: relay step up
2018-08-04 23:37:20,811 - mycodo.pid_autotune - INFO - input: 31.28
2018-08-04 23:38:30,867 - mycodo.pid_autotune - INFO -
2018-08-04 23:38:30,874 - mycodo.pid_autotune - INFO - Cycle: 75
2018-08-04 23:38:30,876 - mycodo.pid_autotune - INFO - found peak: 32.17
2018-08-04 23:38:30,878 - mycodo.pid_autotune - INFO - peak count: 2
2018-08-04 23:38:40,852 - mycodo.pid_autotune - INFO -
2018-08-04 23:38:40,858 - mycodo.pid_autotune - INFO - Cycle: 77
2018-08-04 23:38:40,860 - mycodo.pid_autotune - INFO - switched state: relay step down
2018-08-04 23:38:40,861 - mycodo.pid_autotune - INFO - input: 32.85
2018-08-04 23:40:50,834 - mycodo.pid_autotune - INFO -
2018-08-04 23:40:50,835 - mycodo.pid_autotune - INFO - Cycle: 103
2018-08-04 23:40:50,836 - mycodo.pid_autotune - INFO - found peak: 33.93
2018-08-04 23:40:50,836 - mycodo.pid_autotune - INFO - peak count: 3
2018-08-04 23:42:05,799 - mycodo.pid_autotune - INFO -
2018-08-04 23:42:05,805 - mycodo.pid_autotune - INFO - Cycle: 118
2018-08-04 23:42:05,806 - mycodo.pid_autotune - INFO - switched state: relay step up
2018-08-04 23:42:05,807 - mycodo.pid_autotune - INFO - input: 31.27
2018-08-04 23:43:15,816 - mycodo.pid_autotune - INFO -
2018-08-04 23:43:15,822 - mycodo.pid_autotune - INFO - Cycle: 132
2018-08-04 23:43:15,824 - mycodo.pid_autotune - INFO - found peak: 32.09
2018-08-04 23:43:15,825 - mycodo.pid_autotune - INFO - peak count: 4
2018-08-04 23:43:25,790 - mycodo.pid_autotune - INFO -
2018-08-04 23:43:25,796 - mycodo.pid_autotune - INFO - Cycle: 134
2018-08-04 23:43:25,797 - mycodo.pid_autotune - INFO - switched state: relay step down
2018-08-04 23:43:25,798 - mycodo.pid_autotune - INFO - input: 32.76
2018-08-04 23:45:30,802 - mycodo.pid_autotune - INFO -
2018-08-04 23:45:30,808 - mycodo.pid_autotune - INFO - Cycle: 159
2018-08-04 23:45:30,810 - mycodo.pid_autotune - INFO - found peak: 33.98
2018-08-04 23:45:30,811 - mycodo.pid_autotune - INFO - peak count: 5
2018-08-04 23:45:30,812 - mycodo.pid_autotune - INFO -
2018-08-04 23:45:30,814 - mycodo.pid_autotune - INFO - amplitude: 0.9099999999999989
2018-08-04 23:45:30,815 - mycodo.pid_autotune - INFO - amplitude deviation: 0.06593406593406595
2018-08-04 23:46:40,851 - mycodo.pid_autotune - INFO -
2018-08-04 23:46:40,857 - mycodo.pid_autotune - INFO - Cycle: 173
2018-08-04 23:46:40,858 - mycodo.pid_autotune - INFO - switched state: relay step up
2018-08-04 23:46:40,859 - mycodo.pid_autotune - INFO - input: 31.37
2018-08-04 23:47:55,860 - mycodo.pid_autotune - INFO -
2018-08-04 23:47:55,866 - mycodo.pid_autotune - INFO - Cycle: 188
2018-08-04 23:47:55,868 - mycodo.pid_autotune - INFO - found peak: 32.36
2018-08-04 23:47:55,869 - mycodo.pid_autotune - INFO - peak count: 6
2018-08-04 23:47:55,870 - mycodo.pid_autotune - INFO -
2018-08-04 23:47:55,871 - mycodo.pid_autotune - INFO - amplitude: 0.9149999999999979
2018-08-04 23:47:55,872 - mycodo.pid_autotune - INFO - amplitude deviation: 0.032786885245900406
2018-08-04 23:47:55,873 - mycodo.pid_3b533dff - INFO - time:  16 min
2018-08-04 23:47:55,874 - mycodo.pid_3b533dff - INFO - state: succeeded
2018-08-04 23:47:55,874 - mycodo.pid_3b533dff - INFO -
2018-08-04 23:47:55,875 - mycodo.pid_3b533dff - INFO - rule: ziegler-nichols
2018-08-04 23:47:55,876 - mycodo.pid_3b533dff - INFO - Kp: 0.40927018474290117
2018-08-04 23:47:55,877 - mycodo.pid_3b533dff - INFO - Ki: 0.05846588600007114
2018-08-04 23:47:55,879 - mycodo.pid_3b533dff - INFO - Kd: 0.7162385434443115
2018-08-04 23:47:55,880 - mycodo.pid_3b533dff - INFO -
2018-08-04 23:47:55,881 - mycodo.pid_3b533dff - INFO - rule: tyreus-luyben
2018-08-04 23:47:55,887 - mycodo.pid_3b533dff - INFO - Kp: 0.3162542336649691
2018-08-04 23:47:55,889 - mycodo.pid_3b533dff - INFO - Ki: 0.010165091543194185
2018-08-04 23:47:55,890 - mycodo.pid_3b533dff - INFO - Kd: 0.7028026111719073
2018-08-04 23:47:55,891 - mycodo.pid_3b533dff - INFO -
2018-08-04 23:47:55,892 - mycodo.pid_3b533dff - INFO - rule: ciancone-marlin
2018-08-04 23:47:55,892 - mycodo.pid_3b533dff - INFO - Kp: 0.21083615577664605
2018-08-04 23:47:55,893 - mycodo.pid_3b533dff - INFO - Ki: 0.06626133746674728
2018-08-04 23:47:55,893 - mycodo.pid_3b533dff - INFO - Kd: 0.3644161687558038
2018-08-04 23:47:55,894 - mycodo.pid_3b533dff - INFO -
2018-08-04 23:47:55,894 - mycodo.pid_3b533dff - INFO - rule: pessen-integral
2018-08-04 23:47:55,895 - mycodo.pid_3b533dff - INFO - Kp: 0.49697093861638
2018-08-04 23:47:55,895 - mycodo.pid_3b533dff - INFO - Ki: 0.0887428626786794
2018-08-04 23:47:55,896 - mycodo.pid_3b533dff - INFO - Kd: 1.04627757151908
2018-08-04 23:47:55,896 - mycodo.pid_3b533dff - INFO -
2018-08-04 23:47:55,897 - mycodo.pid_3b533dff - INFO - rule: some-overshoot
2018-08-04 23:47:55,898 - mycodo.pid_3b533dff - INFO - Kp: 0.23191977135431066
2018-08-04 23:47:55,898 - mycodo.pid_3b533dff - INFO - Ki: 0.03313066873337365
2018-08-04 23:47:55,899 - mycodo.pid_3b533dff - INFO - Kd: 1.0823160212047374
2018-08-04 23:47:55,899 - mycodo.pid_3b533dff - INFO -
2018-08-04 23:47:55,900 - mycodo.pid_3b533dff - INFO - rule: no-overshoot
2018-08-04 23:47:55,900 - mycodo.pid_3b533dff - INFO - Kp: 0.1391518628125864
2018-08-04 23:47:55,901 - mycodo.pid_3b533dff - INFO - Ki: 0.01987840124002419
2018-08-04 23:47:55,901 - mycodo.pid_3b533dff - INFO - Kd: 0.6493896127228425
2018-08-04 23:47:55,902 - mycodo.pid_3b533dff - INFO -
2018-08-04 23:47:55,902 - mycodo.pid_3b533dff - INFO - rule: brewing
2018-08-04 23:47:55,903 - mycodo.pid_3b533dff - INFO - Kp: 5.566074512503456
2018-08-04 23:47:55,904 - mycodo.pid_3b533dff - INFO - Ki: 0.11927040744014512
2018-08-04 23:47:55,904 - mycodo.pid_3b533dff - INFO - Kd: 4.101408080354794
Conditional~
Conditional Functions are used to perform simple to complex actions based a user-generated Python code. Conditional Functions allow the execution of Python 3 code as well as the use of Conditions and Actions within your code to interact with Mycodo. Conditions typically acquire data from Mycodo, such as Input measurements, and Actions typically affect Mycodo, such as actuating an Output or pausing a PID controller. Each Condition and Action you add will have its own description and example code to demonstrate how to use it in your Python code.
Note
Timeout must be set longer than it takes your Run Python Code to execute (if Timeout is set too low, only part of your Run Python Code may execute).
Note
Period must be set longer than the time it takes for your Run Python Code to execute, otherwise it will execute again before the previous execution has finished.
Note
The code is executed within the same Python virtual environment that Mycodo runs from, therefore you must install Python libraries to this environment if you want them to be available to your code. This virtualenv is located at /opt/Mycodo/env and if you wanted to install, for example, "my_library" using pip, you would execute "sudo /opt/Mycodo/env/bin/pip install my_library".
Conditional Options~
| Setting | Description |
|---|---|
| Import Python Code | Python 3 code that is used for importing Python libraries. This is executed before the class is created when generating the Conditional Function code. |
| Initialize Python Code | Python 3 code that is executed during the initialization of the class, within __init__(). This is where variables are initialized that will be used within the class. |
| Run Python Code | Python 3 code that will be executed every set Period. This is where the Condtions and Actions are executed. Once a Condition or Action is added, the functions that can be executed for each will be shown above each Condition or Action. |
| Status Python Code | A dictionary can be returned that allows information to be passed to other controllers and widgets. For example, the Function Status Widget will display this information on the Dashboard. This code can be removed if you do not want to return any information. |
| Period (seconds) | The period (seconds) that the Run Python Code will be executed. |
| Start Offset (seconds) | The duration (seconds) to wait before executing the Conditional for the first after it is activated. |
| Log Level: Debug | Show debug lines in the daemon log. |
| Message Includes Code | Include the Python code in the message (self.message) that is passed to Actions. |
Conditions are functions that can be used within the Run Python Code, and return specific information.
| Condition | Description |
|---|---|
| Measurement (Single, Last) | Acquires the latest measurement from an Input or device. Set Max Age (seconds) to restrict how long to accept values. If the latest value is older than this duration, "None" is returned. |
| Measurement (Single, Past, Average) | Acquires the past measurements from an Input or device, then averages them. Set Max Age (seconds) to restrict how long to accept values. If all values are older than this duration, "None" is returned. |
| Measurement (Single, Past, Sum) | Acquires the past measurements from an Input or device, then sums them. Set Max Age (seconds) to restrict how long to accept values. If all values are older than this duration, "None" is returned. |
| Measurement (Multiple, Past) | Acquires the past measurements from an Input or device. Set Max Age (seconds) to restrict how long to accept values. If no values are found in this duration, "None" is returned. This differs from the "Measurement (Single)" Condition because it returns a list of dictionaries with 'time' and 'value' key pairs. |
| GPIO State | Acquires the current GPIO state and returns 1 if HIGH or 0 if LOW. If the latest value is older than this duration, "None" is returned. |
| Output State | Returns 'on' if the output is currently on, and 'off' if it's currently off. |
| Output Duration On | Returns how long the output has currently been on, in seconds. Returns 0 if off. |
| Controller Running | Returns True if the controller is active, False if inactive. |
| Max Age (seconds) | The minimum age (seconds) the measurement can be. If the last measurement is older than this, "None" will be returned instead of a measurement. |
Conditional Setup Guide~
Python 3 is the environment that these conditionals will be executed. The following functions can be used within your Python code.
Note
Python code indentations must use 4 spaces (not 2 spaces, tabs, or anything else).
| Function | Description |
|---|---|
| self.condition("{ID}") | Returns a measurement for the Condition with ID. |
| self.condition_dict("{ID}") | Returns a dictionary of measurement for the Condition with ID. |
| self.run_action("{ID}") | Executes the Action with ID. |
| self.run_all_actions() | Executes all actions. |
| self.logger.info() | Writes a log line to the Daemon log. "info" may also be changed to "warning", "error" or "debug". Debug log lines will only appear in the Daemon log when Logging Level: Debug is enabled for the Input. |
| self.set_custom_option("option", value) | Writes the value to the database for retrieval later. The option argument should be a string, and value can be a string, integer, float, list, or dictionary. |
| self.get_custom_option("option") | Reads the value from the database that was previously written with self.set_custom_option(). Returns None if the option is not found or there is no value. |
There are additional functions that can be used, but these must use the full UUID (not an abridged version as the functions above). See /opt/Mycodo/mycodo/mycodo_client.py for the functions available for use. These may be accessed via the 'control' object. An example, below, will return how long the output has been on (or 0 if it's currently off):
output_on_seconds = control.output_sec_currently_on("1b6ada50-1e69-403a-9fa6-ec748b16dc23")
Since the Python code must be formatted properly, it's best to familiarize yourself with the basics of Python.
Note
There are two different IDs in use here, one set of IDs are found under the Conditions section of the Conditional Function, and one set of IDs are found under the Actions section of the Conditional Function. Read all of this section, including the examples, below, to fully understand how to properly set up a Conditional Function.
Info
If a measurement hasn't been acquired within the set Max Age, "None" will be returned when self.condition("{ID}") is called in the code. It is very important that you account for this. All examples below incorporate a test for the measurement being None, and this should not be removed. If an error occurs (such as if the statement resolves to comparing None to a numerical value, such as "if None < 23"), then the code will stop there and an error will be logged in the daemon log. Accounting for None is useful for determining if an Input is no longer acquiring measurements (e.g. dead sensor, malfunction, etc.).
To create a basic conditional, follow these steps, using the numbers in the screenshots, below, that correspond to the numbers in parentheses:
- Navigate to the
Setup -> Functionpage. - Select "Controller: Conditional", then click
Add. - Under Conditions, select a condition option, then click
Add Condition. - Configure the newly-added Condition then click
Save. - Under Actions, select an action option, then click
Add Action. - Configure the newly-added Action then click
Save. - Notice that each Condition and each Action has its own ID (underlined).
- The default Run Python Code contains placeholder IDs that need to be changed to your Condition and Action IDs. Change the ID in self.condition("asdf1234") to your Condition ID. Change the ID in self.run_action("qwer5678", message=message) to your Action ID. Click
Saveat the top of the Conditional. - The logic used in the Run Python Code will need to be adjusted to suit your particular needs. Additionally, you may add more Conditions or Actions. See the
Advanced Conditional code examples, below, for usage examples.
If your Python code has been formatted correctly, your Conditional will save and it will be ready to activate. If an error is returned, your options will not have been saved. Inspect the error for which line is causing the issue and read the error message itself to try to understand what the problem is and how to fix it. There are an unfathomable number of ways to configure a Conditional, but this should hopefully get you started to developing one that suits your needs.
Note
Mycodo is constantly changing, so the screenshots below may not match what you see exactly. Be sure to read this entire section of the manual to understand how to use Conditional Functions.
Beginner Conditional Run Python Code examples:
Each self.condition("ID") will return the most recent measurement obtained from that particular measurement under the Conditions section of the Conditional Function, as long as it's within the set Max Age.
# Example 1, no measurement (i.e. None) returned
# useful with the Email Notify Action to email when an Input stops working
if self.condition("asdf1234") is None:
    self.run_all_actions()  # Execute all configured actions

# Example 2, test two measurement conditions
measure_1 = self.condition("asdf1234")
measure_2 = self.condition("hjkl5678")
if None not in [measure_1, measure_2]:
    # If neither measurement is None (both are working)
    if measure_1 < 20 and measure_2 > 10:
        # If measure_1 is less than 20 and measure_2 is greater than 10
        self.run_all_actions()  # Execute all configured actions

# Example 3, test two measurements and sum of measurements
measure_1 = self.condition("asdf1234")
measure_2 = self.condition("hjkl5678")
if None not in [measure_1, measure_2]:
    sum_ = measure_1 + measure_2
    if measure_1 > 2 and 10 < measure_2 < 23 and sum_ < 30.5:
        self.run_all_actions()

# Example 4, combine into one conditional
measurement = self.condition("asdf1234")
if measurement is not None and 20 < measurement < 30:  # combine conditions
    self.run_all_actions()

# Example 5, test two measurements
# convert Edge Input from 0 or 1 to True or False
measure_1 = self.condition("asdf1234")
measure_2 = self.condition("hjkl5678")
if None not in [measure_1, measure_2]:
    if bool(measure_1) and measure_2 > 10:
        self.run_all_actions()

# Example 6, test measurement with "or" and a rounded measurement
measure_1 = self.condition("asdf1234")
measure_2 = self.condition("hjkl5678")
if None not in [measure_1, measure_2]:
    if measure_1 > 20 or int(round(measure_2)) in [20, 21, 22]:
        self.run_all_actions()

# Example 7, use self to store variables across multiple executions
measurement = self.condition("asdf1234")
if not hasattr(self, "stored_measurement"):  # Initialize variable
    self.stored_measurement = measurement
if measurement is not None:
    if abs(measurement - self.stored_measurement) > 10:
        self.run_all_actions()  # if difference is greater than 10
    self.stored_measurement = measurement  # Store measurement
The "Measurement (Multiple)" Condition is useful if you desire to check if a particular value has been stored in any of the past measurements (within the set Max Age), not just the last measurement. This is useful if you have an alert system that each numerical value represents a different alert that you need to check each past value if it occurred. Here is an example that retrieves all measurements from the past 30 minutes and checks if any of the measurements in the returned list is equal to "119". If "119" exists, the Actions are executed and break is used to exit the for loop.
# Example 1, find a measurement in the past 30 minutes (Max Age: 1800 seconds)
measurements = self.condition_dict("asdf1234")
if measurements:  # If the list is not empty
    for each_measure in measurements:  # Loop through each measurement in the list
        if each_measure['value'] == 119:
            self.logger.info("Alert 119 found at timestamp {time}".format(
                time=each_measure['time']))
            self.run_all_actions()
            break  # Exit the for loop
Advanced Conditional Run Python Code examples:
These examples expand on the beginner examples, above, by activating specific actions. The following examples will reference actions with IDs that can be found under the Actions section of the Conditional Function. Two example action IDs will be used: "qwer1234" and "uiop5678". Additionally, self.run_all_actions() is used here, which will run all actions in the order in which they were created.
# Example 1
measurement = self.condition("asdf1234")
if measurement is None:
    self.run_action("qwer1234")
elif measurement > 23:
    self.run_action("uiop5678")
else:
    self.run_all_actions()

# Example 2, test two measurements
measure_1 = self.condition("asdf1234")
measure_2 = self.condition("hjkl5678")
if None not in [measure_1, measure_2]:
    if measure_1 < 20 and measure_2 > 10:
        self.run_action("qwer1234")
        self.run_action("uiop5678")

# Example 3, test two measurements and sum of measurements
measure_1 = self.condition("asdf1234")
measure_2 = self.condition("hjkl5678")
if None not in [measure_1, measure_2]:
    sum_ = measure_1 + measure_2
    if measure_1 > 2 and 10 < measure_2 < 23 and sum_ < 30.5:
        self.run_action("qwer1234")
    else:
        self.run_action("uiop5678")

# Example 4, combine into one conditional
measurement = self.condition("asdf1234")
if measurement is not None and 20 < measurement < 30:
    self.run_action("uiop5678")

# Example 5, test two measurements, convert Edge Input from 0/1 to True/False
measure_1 = self.condition("asdf1234")
measure_2 = self.condition("hjkl5678")
if None not in [measure_1, measure_2]:
    if bool(measure_1) and measure_2 > 10:
        self.run_all_actions()

# Example 6, test measurement with "or" and a rounded measurement
measure_1 = self.measure("asdf1234")
measure_2 = self.measure("hjkl5678")
if None not in [measure_1, measure_2]:
    if measure_1 > 20 or int(round(measure_2)) in [20, 21, 22]:
        self.run_action("qwer1234")
        if measure_1 > 30:
            self.run_action("uiop5678")
If your Action is a type that receives a message (E-Mail or Note), you can modify this message to include extra information before it is passed to the function (so the new information is passed to the Note, E-Mail, etc.). To do this, append a string to the variable self.message and add this to the message parameter of self.run_action() or self.run_all_actions(). Below are some examples. Note the use of "+=" instead of "=", which appends the string to the variable self.message instead of overwriting it.
# Example 1
measurement = self.measure("asdf1234")
if measurement is None and measurement > 23:
    self.message += "Measurement was {}".format(measurement)
    self.run_action("uiop5678}", message=self.message)

# Example 2
measure_1 = self.measure("asdf1234")
measure_2 = self.measure("hjkl5678")
if None not in [measure_1, measure_2]:
    if measure_1 < 20 and measure_2 > 10:
        self.message += "Measurement 1: {m1}, Measurement 2: {m2}".format(
            m1=measure_1, m2=measure_2)
        self.run_all_actions(message=self.message)
Logging can also be used to log messages to the daemon log using self.logger. Logging levels include "info", "warning", "error" and "debug". Debug log lines will only appear in the Daemon log when Logging Level: Debug is enabled for the Input.
# Example 1
measurement = self.measure("asdf1234")
if measurement is None and measurement > 23:
    self.logging.error("Warning, measurement was {}".format(measurement))
    self.message += "Measurement was {}".format(measurement)
    self.run_action("uiop5678}", message=self.message)
Before activating any conditionals, it's advised to thoroughly explore all possible scenarios and plan a configuration that eliminates conflicts. Some devices or outputs may respond atypically or fail when switched on and off in rapid succession. Therefore, trial run your configuration before connecting devices to any outputs.
Trigger~
A Trigger Controller will execute actions when events are triggered, such as an output turning on or off, a GPIO pin changing it's voltage state (Edge detection, rising or falling), timed events that include various timers (duration, time period, time point, etc), or the sunrise/sunset time at a specific latitude and longitude. Once the trigger is configured, add any number of Actions to be executed when that event is triggered.
Output (On/Off) Options~
Monitor the state of an output.
| Setting | Description |
|---|---|
| If Output | The Output to monitor for a change of state. |
| If State | If the state of the output changes to On or Off the conditional will trigger. If "On (any duration) is selected, th trigger will occur no matter how long the output turns on for, whereas if only "On" is selected, the conditional will trigger only when the output turns on for a duration of time equal to the set "Duration (seconds)". |
| If Duration (seconds) | If "On" is selected, an optional duration (seconds) may be set that will trigger the conditional only if the Output is turned on for this specific duration. |
Output (PWM) Options~
Monitor the state of a PWM output.
| Setting | Description |
|---|---|
| If Output | The Output to monitor for a change of state. |
| If State | If the duty cycle of the output is greater than,less than, or equal to the set value, trigger the Conditional Actions. |
| If Duty Cycle (%) | The duty cycle for the Output to be checked against. |
Edge Options~
Monitor the state of a pin for a rising and/or falling edge.
| Setting | Description |
|---|---|
| If Edge Detected | The conditional will be triggered if a change in state is detected, either Rising when the state changes from LOW (0 volts) to HIGH (3.5 volts) or Falling when the state changes from HIGH (3.3 volts) to LOW (0 volts), or Both (Rising and Falling). |
Run PWM Method Options~
Select a Duration Method and this will set the selected PWM Output to the duty cycle specified by the method.
| Setting | Description |
|---|---|
| Duration Method | Select which Method to use. |
| PWM Output | Select which PWM Output to use. |
| Period (seconds) | Select the interval of time to calculate the duty cycle, then apply to the PWM Output. |
| Trigger Every Period | Trigger Conditional Actions every period. |
| Trigger when Activated | Trigger Conditional Actions when the Conditional is activated. |
Sunrise/Sunset Options~
Trigger events at sunrise or sunset (or a time offset of those), based on latitude and longitude.
| Setting | Description |
|---|---|
| Rise or Set | Select which to trigger the conditional, at sunrise or sunset. |
| Latitude (decimal) | Latitude of the sunrise/sunset, using decimal format. |
| Longitude (decimal) | Longitude of the sunrise/sunset, using decimal format. |
| Zenith | The Zenith angle of the sun. |
| Date Offset (days) | Set a sunrise/sunset offset in days (positive or negative). |
| Time Offset (minutes) | Set a sunrise/sunset offset in minutes (positive or negative). |
Timer (Duration) Options~
Run a timer that triggers Conditional Actions every period.
| Setting | Description |
|---|---|
| Period (seconds) | The period of time between triggering Conditional Actions. |
| Start Offset (seconds) | Set this to start the first trigger a number of seconds after the Conditional is activated. |
Timer (Daily Time Point) Options~
Run a timer that triggers Conditional Actions at a specific time every day.
| Setting | Description |
|---|---|
| Start Time (HH:MM) | Set the time to trigger Conditional Actions, in the format "HH:MM", with HH denoting hours, and MM denoting minutes. Time is in 24-hour format. |
Timer (Daily Time Span) Options~
Run a timer that triggers Conditional Actions at a specific period if it's between the set start and end times. For example, if the Start Time is set to 10:00 and End Time set to 11:00 and Period set to 120 seconds, the Conditional Actions will trigger every 120 seconds when the time is between 10 AM and 11 AM.
This may be useful, for instance, if you desire an Output to remain on during a particular time period and you want to prevent power outages from interrupting the cycle (which a simple Time Point Timer could not prevent against because it only triggers once at the Start Time). By setting an Output to turn the lights on every few minutes during the Start -> End period, it ensured the Output remains on during this period.
| Setting | Description |
|---|---|
| Start Time (HH:MM) | Set the start time to trigger Conditional Actions, in the format "HH:MM", with HH denoting hours, and MM denoting minutes. Time is in 24-hour format. |
| End Time (HH:MM) | Set the end time to trigger Conditional Actions, in the format "HH:MM", with HH denoting hours, and MM denoting minutes. Time is in 24-hour format. |
| Period (seconds) | The period of time between triggering Conditional Actions. |